Virtual Private Network (VPN) may be used to access Texas A&M’s network remotely. The following steps will walk through installing Cisco’s pre-configured client and connecting to the VPN for Windows, Mac, and Linux users.
Install pre-configured client for VPN
Installation of Cisco VPN is dependent upon enabling Duo Two-Factor Authentication on a personal device.
Installation and Configuration for Windows
Navigate to TAMU Connect and login with your NetID and password
Group tunnel_all_traffic
NetID
netidPassword
password
On the following screen, click on the blue Download for Windows icon
Click on the executable file that appears at the bottom of the browser to open the AnyConnect Secure Mobility Client Setup wizard
Click on the Run icon on the pop up that appears at the bottom of the screen for browsers other than Google Chrome (i.e. Microsoft Edge, Internet Explorer, Firefox).
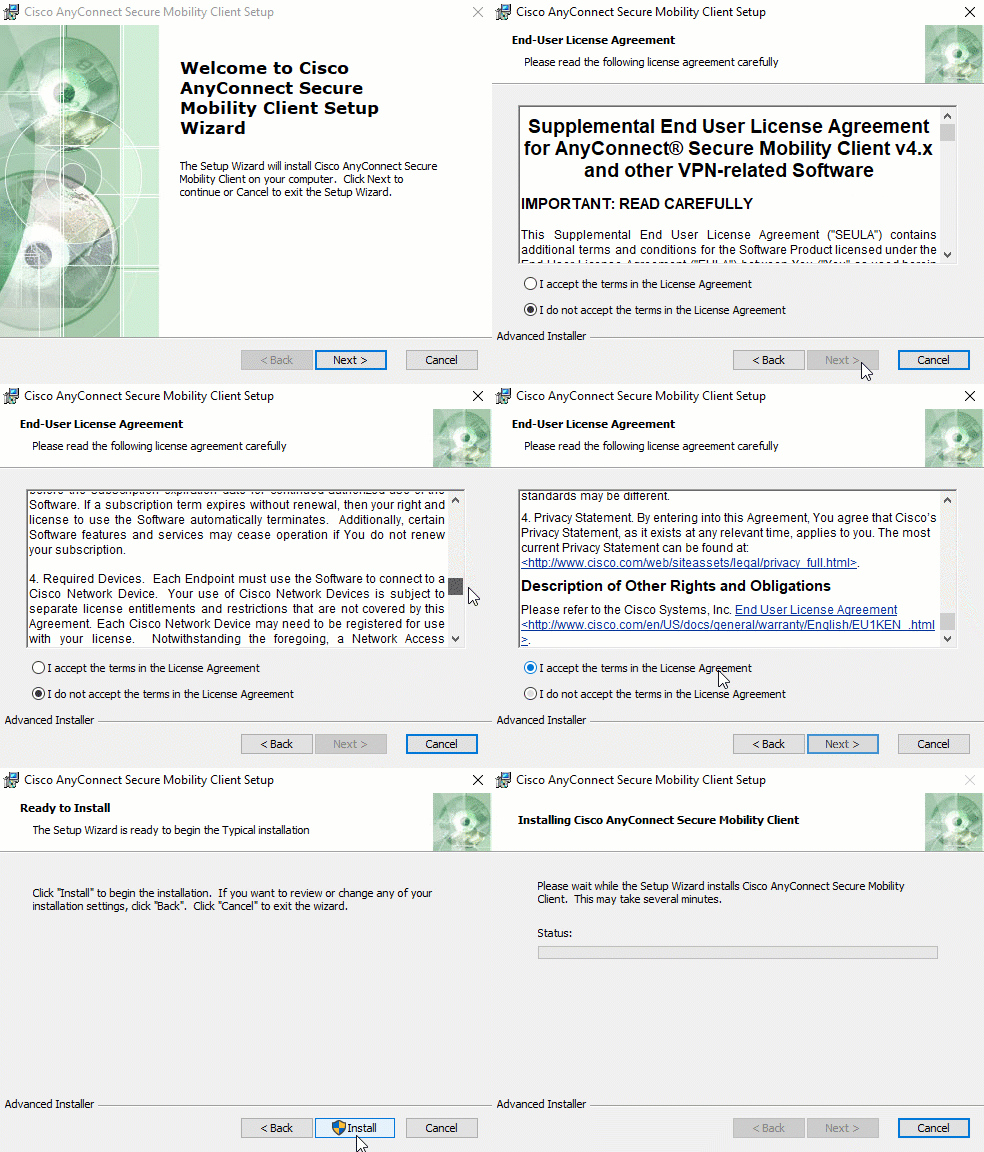
Complete the Setup Wizard:
Click Next >
Select I accept the terms in the License Agreement and then click Next >
Click on the Install icon
If prompted for User Account Control credentials, enter an admin username and password
Click Finish to exit the wizard once the installation is complete
Type
Ciscoin the Windows search bar to launch the Cisco AnyConnect Secure Mobility Client or look for it in the hidden icons on the bottom right-hand side of the taskbarType
connect.tamu.eduinto the empty field and click ConnectEnter your TAMU credentials in the following pop up box and click OK
Group tunnel_all_traffic
Username
netidPassword
password
Accept the DUO push notification on your mobile device to authenticate and successfully connect to Cisco VPN
Installation and Configuration for Mac
Navigate to TAMU Connect and login with your NetID and password
Group tunnel_all_traffic
NetID
netidPassword
password
On the following screen, click on the blue Download for macOS icon
Open the Downloads folder and double click on the .dmg file
In the pop up window, double click on the .pkg file to open the AnyConnect Secure Mobility Client installer
Complete the Installer:
Click Continue
Click Continue and click Agree to accept the Software License Agreement
Click on the Install icon
If prompted for credentials, enter a username and password with administrative privileges and click Install Software
Click Close
Open the Cisco AnyConnect Secure Mobility Client through Applications or Launchpad
Type
connect.tamu.eduinto the empty field and click ConnectEnter your TAMU credentials in the following pop up box and click OK
Group tunnel_all_traffic
Username
netidPassword
password
Accept the DUO push notification on your mobile device to authenticate and successfully connect to Cisco VPN
Supplemental Resources
Please refer to the Division of IT’s Knowledge Base for further information on connecting to VPN.


